Building a house is one of those once-in-a-lifetime projects that can either become your proudest achievement or your biggest regret. If you are confused about where to start, worried about budget overruns, or scared of being misled by contractors, you are not alone. With the right house construction tips and a clear roadmap, you can turn this stressful journey into a well-managed project where every decision is informed and intentional.
Plan before you start digging
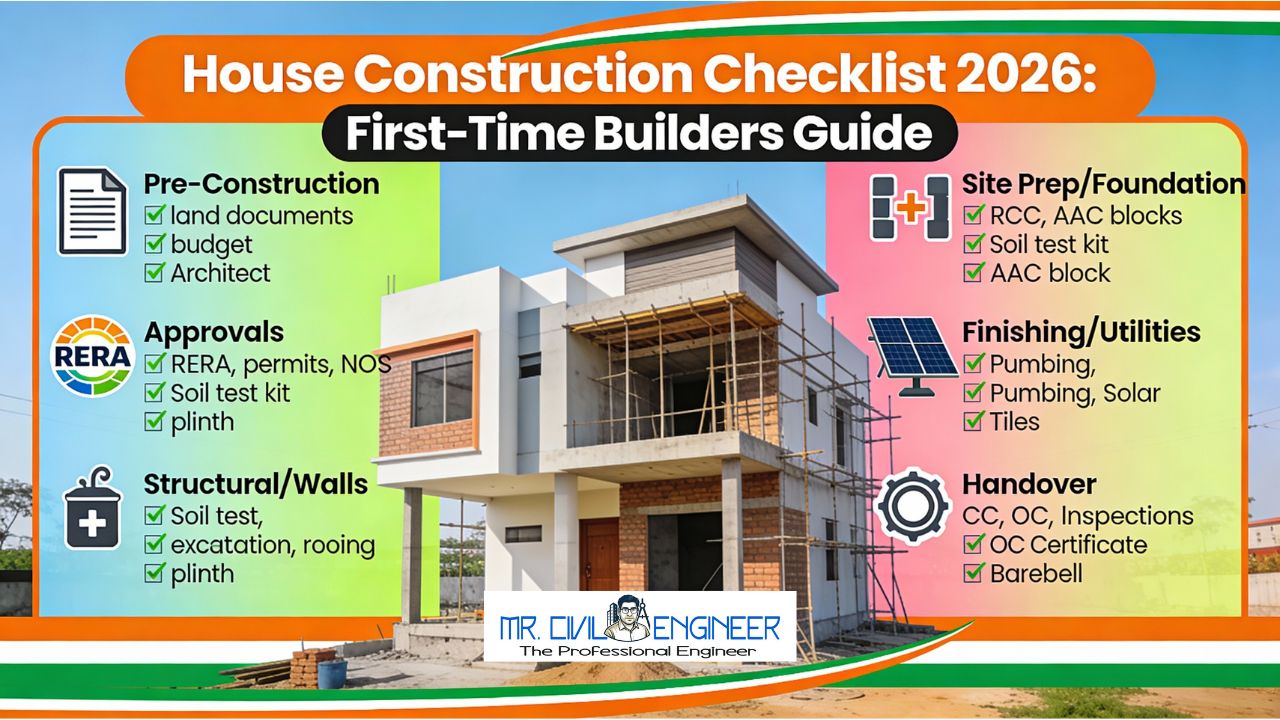
The biggest mistake many families make is starting construction without a clear plan, hoping to “adjust” things on site. Good planning begins with defining your needs: number of bedrooms, parking, home office, parents’ room on ground floor, storage, and future expansion possibilities. Once you know what you need, you can discuss a realistic built-up area and budget with your architect or engineer.
Plot selection is another crucial step that directly affects construction cost and safety. Always check legal documents, land use permissions, and ensure that the plot is in a residential zone with proper road access. Basic checks for soil quality, groundwater level, and flooding history go a long way in avoiding future foundation and dampness issues.
Build the right team
A strong team is your best insurance against costly mistakes. Many people try to save money by skipping a qualified architect or structural engineer, but this often leads to overdesigned or unsafe structures and expensive rework. A good architect will help you create a functional, well-lit, and ventilated plan, while a structural engineer will design safe and economical foundations, columns, beams, and slabs.
You will typically choose between an item-rate contractor (paid as per actual quantities) and a turnkey contractor (lump-sum for the whole project). Each has pros and cons: item-rate offers more transparency but needs closer supervision, while turnkey gives cost certainty but demands a very clear specification and contract. Having proper drawings, specifications, and a written agreement with payment terms, timelines, and quality standards is non-negotiable.
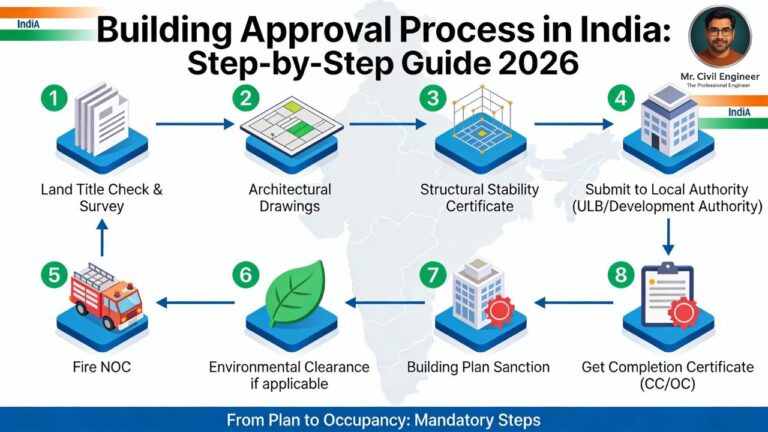
Approvals, permissions, and design basics
Before starting work, ensure your building plan is sanctioned by the local authority as per building bye-laws and FAR/FSI norms. Constructing without approvals can lead to penalties, demolition notices, and problems during resale or loan processing. Keep copies of all approvals, drawings, and correspondence safely filed.
In design, focus on orientation and natural light. North and east-facing openings are generally preferred for comfortable daylight, while south and west sides may need shading to reduce heat gain in hot regions. If you follow Vastu, incorporate key directions and room placements at planning stage rather than forcing changes during construction. Also, plan electrical and plumbing routes, rainwater harvesting, and future provisions for solar panels or extra rooms while designing, not after the structure is up.
Foundations and structure: never compromise
Your foundation and RCC structure are like the skeleton of your home; if this is weak, no amount of expensive interiors can save the building. Even a basic soil investigation or local soil assessment helps in choosing the right foundation type—isolated footings, combined footings, raft, or piles—depending on soil bearing capacity and groundwater conditions. A structural engineer should size your columns, beams, and slabs based on loads, not on guesswork or “standard sizes” suggested on site.
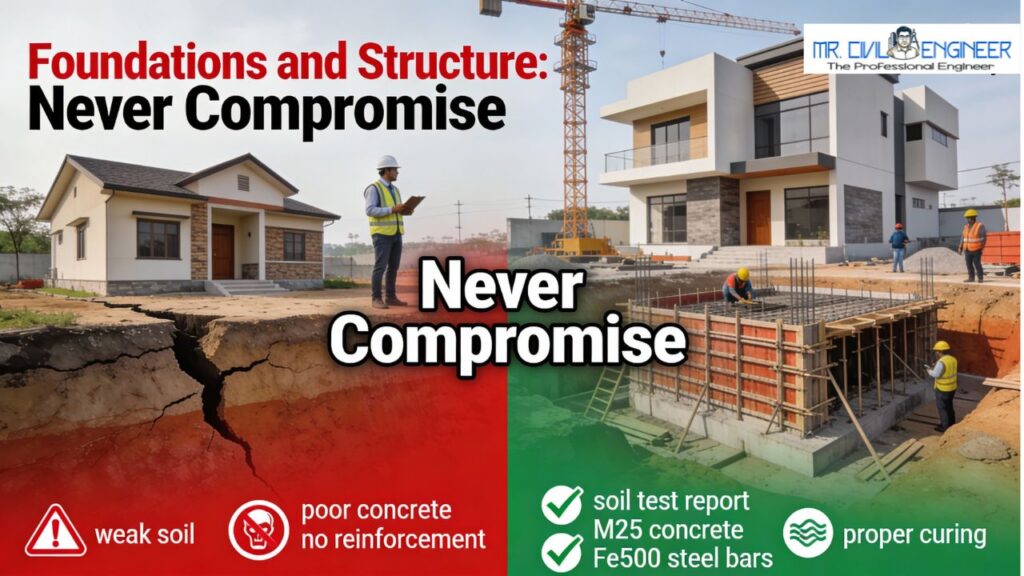
During concreting, pay attention to mix proportion, compaction, cover blocks, and curing. Proper curing for at least 7–10 days for slabs and structural elements is essential for achieving strength and preventing cracks. Simple checks like ensuring reinforcement is not exposed, shuttering is firm and leak-proof, and columns are vertical can be done by any alert homeowner during site visits.
Walls and material choices
Once the skeleton is ready, walls give shape to your rooms and have a major impact on thermal comfort and cost. Traditional burnt clay bricks are popular, but many owners now use AAC blocks or fly ash bricks which are lighter, more uniform, and offer better thermal insulation. AAC blocks can reduce structural loads and speed up masonry, while fly ash bricks help utilize industrial waste and support sustainability.
Regardless of the material, good workmanship is crucial. Maintain uniform joint thickness, ensure walls are plumb and straight, and cure masonry to avoid shrinkage cracks. Provide proper lintels over openings and avoid random breaking of walls later for extra doors, windows, or chases for services.
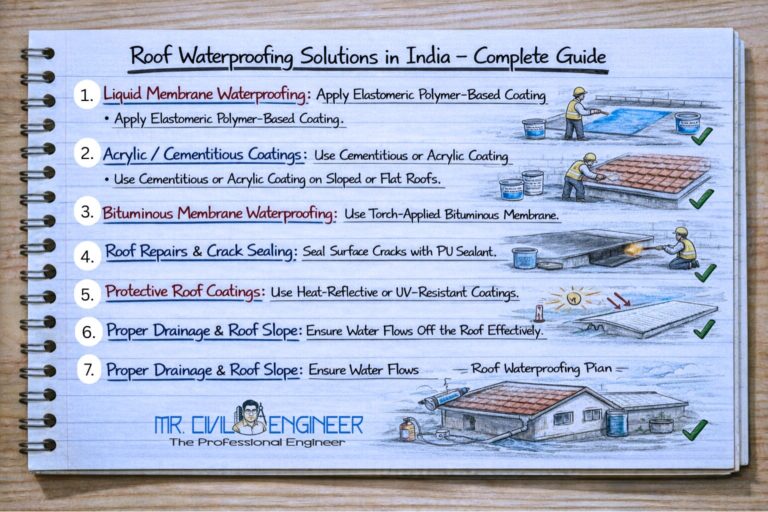
Waterproofing, damp-proofing, and drainage
Water is one of the biggest enemies of a building if not controlled properly. Terrace slabs must be waterproofed with a proven system suitable for your climate and budget, and slopes should be provided to drain rainwater quickly. Bathrooms and balconies need proper slopes, waterproofing in sunken portions, and testing before tiles are laid.
At plinth level, a good damp-proof course and proper external plaster help reduce rising dampness and seepage. Plan site drainage so that surface water flows away from the building and does not accumulate near foundations, and consider rainwater harvesting pits to recharge groundwater and comply with local norms.

Electrical, plumbing, and safety essentials
Services are often hidden but they decide day-to-day comfort and safety. Prepare an electrical layout showing switchboard positions, light points, fan points, AC points, kitchen appliances, and backup power connections before chasing walls. Use branded wires, switches, MCBs, and ensure proper earthing to reduce fire and shock risks.
Similarly, plan plumbing routes to minimize unnecessary bends and long runs. Concealed pipes should be pressure-tested before covering; fixing leaks after tiling is extremely expensive and messy. Provide separate lines for drinking water, overhead tanks, and consider provisions for water filters, solar water heaters, and washing machine points from the start.
Finishes that balance cost and quality
Many budgets explode in the finishing stage because of last-minute upgrades in tiles, fittings, and false ceilings. Decide finish levels early:
- Flooring: Vitrified tiles are popular for their durability and low maintenance, while ceramic tiles can be economical for bathrooms and balconies; natural stones like granite or Kota are durable but need careful selection and polishing.
- Doors and windows: Solid wood looks premium but is costly and needs maintenance; UPVC or aluminium windows are more durable and better sealed against weather in many cases.
For walls, a combination of putty and good-quality interior paint improves appearance and longevity, while weather-resistant exterior paints protect plaster from rain and UV. Emphasize correct surface preparation and curing between coats rather than just brand names.
Smart ways to save cost without killing quality
Cost saving does not mean using the cheapest materials; it means using the right materials in the right place. Simple, compact building shapes with fewer unnecessary offsets, projections, and complex beams reduce both construction cost and future leakage points. Avoid over-sized rooms and under-used spaces like very wide passages that add area but not value.
On the material side, using PPC or PSC cement for most structural and masonry works is common, while OPC can be reserved for specific structural elements based on engineer advice. In coastal or high-moisture regions, PSC cement and AAC or fly ash-based materials often perform better against corrosion and dampness. Controlling wastage through proper storage, accurate ordering, and supervision can easily save several percentage points of your total budget.
Quality control and site monitoring
Even the best design fails without supervision. Regular site visits—by you, your engineer, or a project manager—help detect problems early when they are cheap to fix. Maintain a simple diary of dates, stages completed, concrete quantities, and any instructions given on site.
Create checklists for key stages: foundation, RCC, masonry, plaster, flooring, and services. For example, before concreting a slab, check reinforcement, cover, supports, openings, and service conduits; before plaster, check surface preparation and plumbing/electrical embedment. Paying as per milestones rather than only on calendar dates keeps everyone aligned on progress and quality.
Common mistakes to avoid
- Starting construction without final approved drawings and a sanctioned plan.
- No written contract, leading to disputes over rates, scope, and timelines.
- Ignoring structural advice for cosmetic reasons, like cutting beams or columns for “more space”.
- Over-prioritizing interiors and expensive finishes while compromising on structure, waterproofing, and services.
Avoiding these mistakes alone can save lakhs over the life of the building through fewer repairs, lower maintenance, and better energy performance.
FAQs on house construction in India
1. How much does it cost to build a 2 or 3 BHK house in India in 2025?
Construction cost varies widely by city, material choice, labour rates, and specification, but most guides for 3 BHK independent houses in 2025 show a broad range per square foot, with metros and premium finishes at the higher end. Instead of chasing a single figure, get city-specific estimates and always keep a 10–15% contingency.
2. Which is the best brick or block for house construction?
There is no single “best” material; burnt clay bricks, fly ash bricks, and AAC blocks all work when properly designed and executed. AAC and fly ash blocks offer better thermal comfort and speed, while traditional bricks may be easier to source in some regions.
3. Which cement is best for home construction?
For most home projects, PPC or PSC cement is used widely due to better long-term durability, especially in aggressive or coastal environments. OPC is also used, but cement type and grade should be chosen based on structural design and local exposure conditions.
4. How long does it take to construct a typical G+1 house?
Timeline depends on plot size, design complexity, budget, and local conditions, but many independent G+1 homes take around 9–15 months from excavation to finishing under normal conditions. Fast-tracking often leads to compromised curing and quality, so balance speed with workmanship.
5. Should I follow Vastu for my new house?
If Vastu is important to you or your family, it is best to integrate key Vastu principles at the planning stage with your architect instead of forcing changes on site later. Even if you are not strict about Vastu, good orientation, light, and ventilation principles align with many Vastu recommendations.
Conclusion: Build with clarity, not confusion
House construction does not have to be a blind leap of faith where you depend entirely on what others tell you. When you understand the basic process—from planning, design, and approvals to structure, waterproofing, services, and finishes—you can ask the right questions and make confident decisions at every step. With the right house construction tips, a strong professional team, and consistent site supervision, your dream home can be safe, comfortable, and within budget for decades to come.
- Best Sustainable Construction Materials for 2026: Build Greener, Smarter, and Future‑Ready
- Green Infrastructure Design Tips: Practical Ideas for Cooler, Flood‑Safe Cities
- Robot-Assisted Construction Techniques: Faster, Safer Sites in 2026
- Civil Engineering Trends in Smart Cities: India 2026 Guide
- How to Use BIM in Civil Projects: Step-by-Step Guide