Have you ever seen a reinforced concrete beam crack badly—even though the design calculations were correct?
In most real-life cases, the problem is not design, but poor reinforcement detailing.
Beam reinforcement detailing rules ensure that forces calculated on paper are properly transferred through steel and concrete on site. This guide explains beam detailing in simple language, backed by site logic, not just textbook theory.
What Is Beam Reinforcement Detailing?
Beam reinforcement detailing is the process of arranging steel bars inside a beam based on design intent, code provisions, and construction practicality.
👉 Design tells how much steel is required
👉 Detailing decides where and how that steel is placed
Poor detailing can lead to:
- Cracks at supports
- Excessive deflection
- Shear failure
- Reduced durability
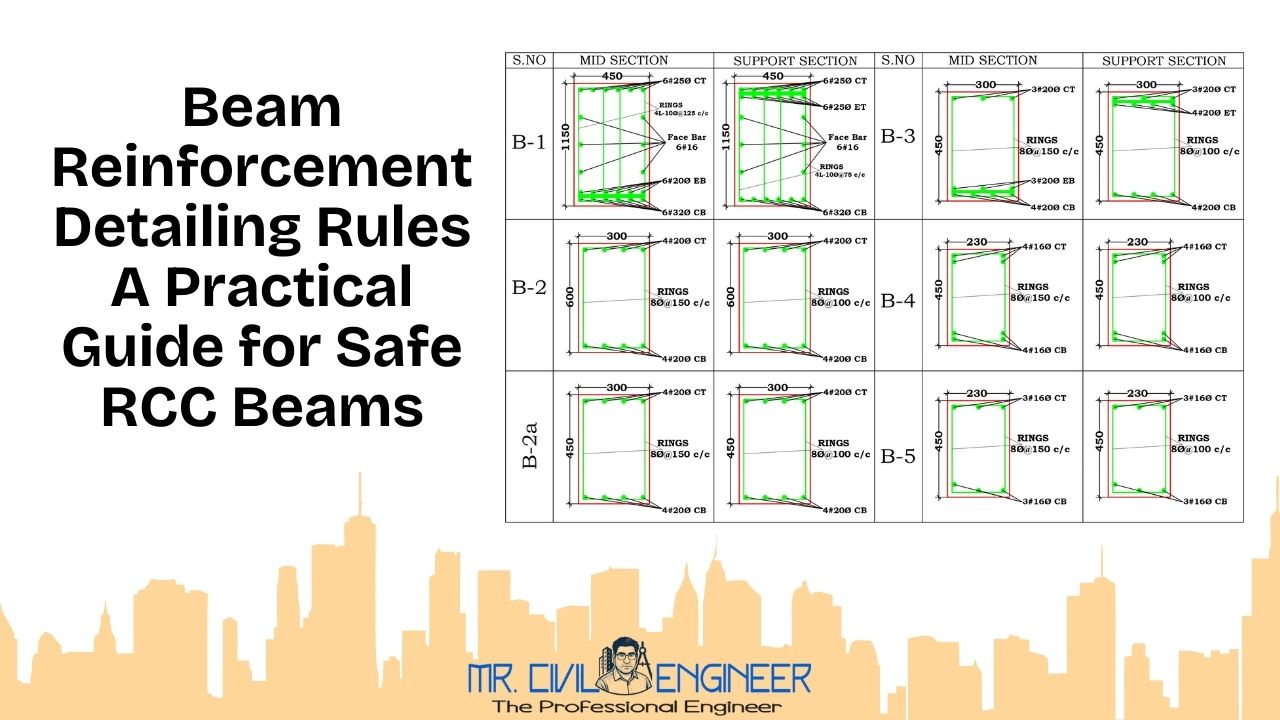
Types of Reinforcement in RCC Beams
1. Main (Tension) Reinforcement
- Placed at the bottom in simply supported beams
- Resists bending tension
2. Compression Reinforcement
- Placed at the top
- Helps in controlling deflection and increasing ductility
3. Shear Reinforcement (Stirrups)
- Vertical or inclined closed loops
- Prevent diagonal shear cracks
4. Side Face Reinforcement
- Required in deep beams
- Controls surface cracking
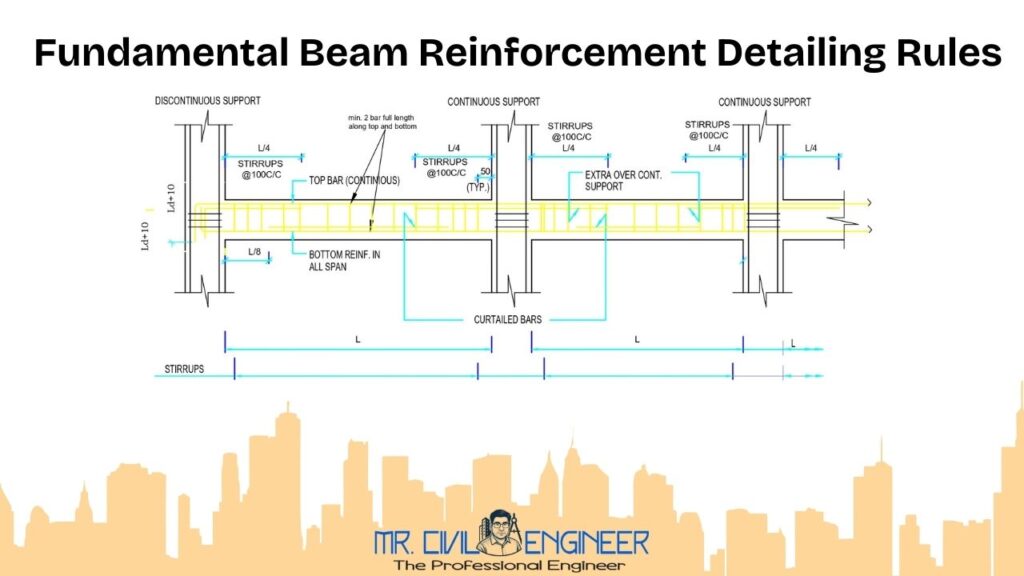
Fundamental Beam Reinforcement Detailing Rules
These rules are primarily based on IS provisions published by Bureau of Indian Standards.
1. Minimum & Maximum Reinforcement
- Minimum tension steel prevents sudden failure
- Excess steel causes congestion and poor concreting
✔ Balanced reinforcement = safety + workability
2. Clear Cover Rules
- Protects steel from corrosion
- Ensures fire resistance
- Typical beam clear cover: 25–40 mm (depending on exposure)
3. Spacing Between Bars
- Adequate spacing allows proper concrete flow
- Prevents honeycombing
- Bars should not touch each other
4. Curtailment Rules (Bar Cutting)
- Bars should not be stopped abruptly
- Extra anchorage must be provided
- Curtailment zones depend on bending moment diagram
5. Development Length & Anchorage
- Ensures full strength transfer from steel to concrete
- Hooks or bends are used when straight length is insufficient
- Inadequate development length = bar slip failure
6. Lapping Rules
- Laps should not be provided near maximum stress zones
- Avoid lapping near supports
- Prefer staggered laps, not all at one section
Stirrups & Shear Reinforcement Rules
- Stirrups spacing is closer near supports
- Wider spacing allowed at mid-span
- Closed stirrups with proper hooks are mandatory
- In seismic zones, detailing becomes more critical
Common Beam Detailing Mistakes (Seen on Site)
🚫 Laps provided at supports
🚫 Insufficient anchorage length
🚫 Stirrups missing near beam-column junction
🚫 Too many bars congested in narrow beam
🚫 Clear cover ignored due to poor spacers
👉 Most failures start with small detailing negligence.
Practical Tips for Engineers & Site Supervisors
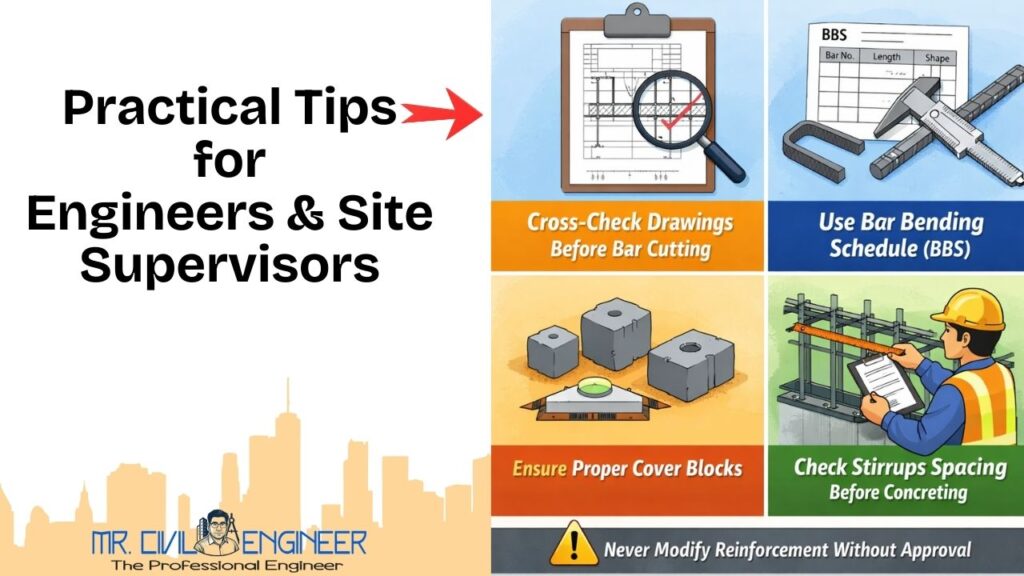
✔ Always cross-check drawings before bar cutting
✔ Use bar bending schedules (BBS)
✔ Ensure proper cover blocks
✔ Check stirrup spacing before concreting
✔ Never modify reinforcement without designer approval
Frequently Asked Questions (FAQs)
Q1. Can lapping be done near supports?
No. Supports experience maximum shear and negative moments.
Q2. What is the minimum number of bars in a beam?
Usually at least two bars in tension zone.
Q3. Why hooks are compulsory in stirrups?
Hooks prevent stirrup opening under shear forces.
Conclusion: Detailing Is the Backbone of Structural Safety
Beam reinforcement detailing rules are not optional guidelines—they are structural safety requirements.
A well-detailed beam:
- Performs as designed
- Lasts longer
- Protects lives
👉 Remember: Good design fails without good detailing.
If you’re a student, site engineer, or consultant—mastering beam detailing will instantly elevate your professional confidence.
Trending Articles